File connections
File connections define the data sources for DataMasque to read from and data destinations for the masked files to be written.
- Overwriting Data
- Supported connection types
- Supported file types
- Add a new file connection
- View and edit file connections
- Delete file connections
- Configuring access between DataMasque and AWS S3 Buckets
Overwriting Data
DataMasque will overwrite data in the destination with masked data from the source. If a file is in the source but is
not masked by DataMasque (for example, if a skip or include rule has
been applied) then that file will not be copied to the destination.
DataMasque does not perform any synchronisation of directory contents between source and destination. That is, if a file exists in the destination but not in the source, the destination file remains untouched. DataMasque will not remove files from the destination that do not exist in the source.
Supported connection types
DataMasque supports AWS S3 Buckets and Azure Blob Storage as data sources or data destinations.
AWS S3 Buckets
For security best practices, DataMasque will not mask to or from an S3 Bucket that is publicly accessible. A bucket is considered public if:
- It has ACL settings
BlockPublicAcls,BlockPublicPolicy,IgnorePublicAcls, orRestrictPublicBucketsset tofalseor missing; or - It has a
PolicyStatusofIsPublic; or - It has public ACL grants.
While these are not requirements, we also recommend that:
- Server side encryption (SSE-S3) is enabled for the bucket.
- S3 versioning is disabled.
Azure Blob Storage Containers
For security, DataMasque will not mask to or from a Blob Container that is publicly accessible. A container is considered public if:
- It has a
blobpublic access policy; or - It has a
containerpublic access policy.
Supported file types
DataMasque supports masking the following files types:
Object File Types
- JSON
- XML
- Other text-files*
* Only full-file redaction available for other text-based files.
Use a mask_file task to mask object files.
Multi-Record Object File Types
- NDJSON
- Avro
Use a mask_file task to mask multi-record object files.
Tabular File Types
- Character-Delimited (CSV, TDVs or other arbitrary character)
- Parquet
- Fixed-Width
Use mask_tabular_file task to mask tabular files.
Add a new file connection
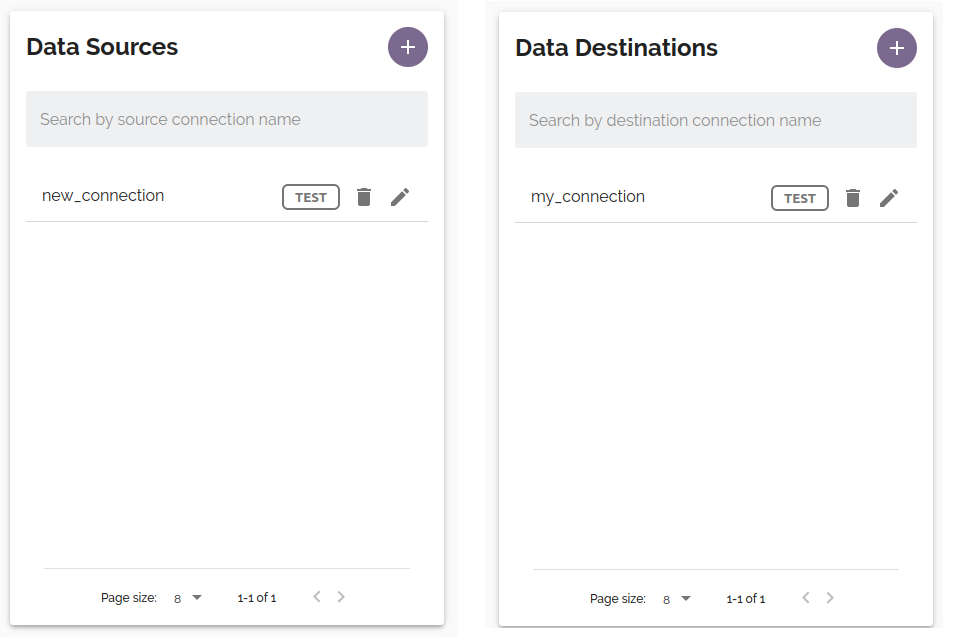
To add a file connection (Data source/Data destination), click the ![]() button from Data Sources panel or Data Destinations of the File masking dashboard.
button from Data Sources panel or Data Destinations of the File masking dashboard.
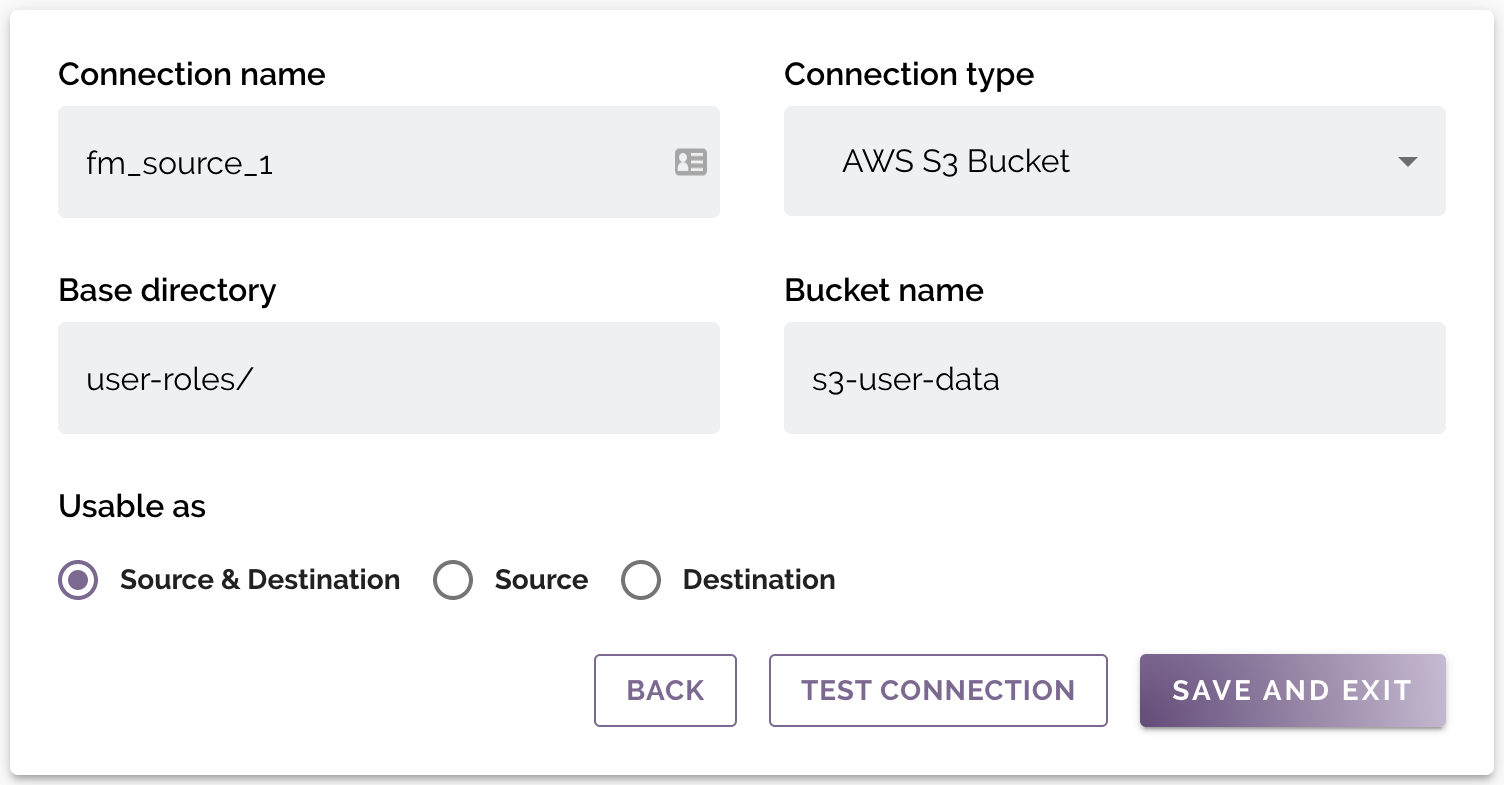
Use the form to configure the file connection parameters. You may validate that the connection parameters are correct using the Test Connection button. This will attempt a connection using the provided parameters. If the connection fails, an error will be shown with the failure details. The Test button is also available from the dashboard.

Connection Parameters
Standard parameters
| Connection name | A unique name for the connection across the DataMasque instance. May only contain alphanumeric characters and underscores. |
| Connection type | The type of the data source. Available options: AWS S3 Bucket or Azure Blob Storage. |
| Base directory | The base directory containing target files to mask or for masked files to be written. To mask all files in a source (Bucket or Container), leave this blank. |
| Usable as | Select if the file connections is usable as a Source, Destination, or both Source & Destination. |
Connections that are usable as Source only have data read from them for masking. Those marked as Destination are only written to. Any marked as Source & Destination can have data read from or written to. This option also affects which of the Source or Destination columns the connection appears in.
Connection Specific parameters
AWS S3 Bucket
For AWS S3 Bucket connections, the following field is required:
| Bucket name | The name of the S3 bucket where the files to be masked are stored. |
Azure Blob Storage
For Azure Blob Storage connections, the following fields are required:
| Container name | The name of the Azure Blob Storage Container where the files to be masked are stored. |
| Connection string | The connection string configured with the authorization information to access data in your Azure Storage account. |
The Connection string can be found in the Azure Portal under Security > Access keys for the Storage Account for the container. It will look something like:
DefaultEndpointsProtocol=https;AccountName=accountnameqaz123;AccountKey=SARJXXMtehNFxKI3CQRFNUchRloiGVVWYDETTydbcERISktTKUw=;EndpointSuffix=core.windows.net
View and edit file connections
To edit a connection, click the edit (![]() ) button for the connection you wish to edit in the Connections panel of the File masking dashboard.
) button for the connection you wish to edit in the Connections panel of the File masking dashboard.
A full list of connection parameters can be found under Connection Parameters.

Delete file connections
To delete a connection, open the connection for editing (see View and edit file connections) and click the Delete button. You will be prompted for confirmation before the connection is deleted.
A connection can also be deleted from the dashboard by clicking the trashcan icon.![]()
![]()
Note:
- Deleting a connection only deletes it from the side it was deleted from, e.g. If a connection is present on both
- sources and destinations, after deleting the connection from the destinations, it will still be present as a source.
Configuring access between DataMasque and AWS S3 Buckets
If access is restricted from DataMasque to the file connection AWS credentials may need to be set up to access the AWS S3 bucket in order to mask the files. To do this, execute the following steps:
For AWS EC2 instances
Your Amazon S3 Bucket must have read-write access to the S3 bucket configured on your connections.
Follow the steps below to configure the AWS EC2 instance that will be accessing your S3 bucket:
- Open the Amazon IAM console, create an IAM policy. The following example IAM policy grants programmatic read-write access to an example bucket. The placeholder <bucket-name> should be replaced with the name of the bucket:
{
  "Version": "2012-10-17",
  "Statement": [
    {
      "Sid": "BucketPermissionCheck",
      "Effect": "Allow",
      "Action": [
        "s3:ListBucket",
        "s3:GetBucketAcl",
        "s3:GetBucketPolicyStatus",
        "s3:GetBucketPublicAccessBlock",
        "s3:GetBucketObjectLockConfiguration"
        ],
      "Resource": ["arn:aws:s3:::<bucket-name>"]
    },
    {
      "Sid": "BucketReadWrite",
      "Effect": "Allow",
      "Action": [
        "s3:PutObject",
        "s3:GetObject"
      ],
      "Resource": ["arn:aws:s3:::<bucket-name>/*"]
    }
  ]
}
Note: The
Sidattributes are optional and are left here to indicate the effect of the statements.
- Create an IAM role:
- Select
AWS serviceas the trusted identity,EC2as the use case. - Attach the policy created from the previous step to the role.
- Select
- Open the Amazon EC2 console:
- Choose Instances.
- Select the instance that you want to attach the IAM role to.
- Choose the Actions tab, choose Security and then choose Modify IAM role.
- Select the IAM role to attach to your EC2 instance.
- Finally, choose Save.
When specifying different buckets for source and destination connections, the policy can be split to only give the relevant permissions to each bucket. Please refer below to the IAM policy that will grant only the necessary permissions to <source-bucket> and <destination-bucket> buckets.
{
    "Version": "2012-10-17",
    "Statement": [
        {
            "Sid": "SourceBucketRead",
            "Effect": "Allow",
            "Action": "s3:GetObject",
            "Resource": "arn:aws:s3:::<source-bucket>/*"
        },
       {
            "Sid": "SourceBucketPermissionCheck",
            "Effect": "Allow",
            "Action": [
              "s3:ListBucket",
              "s3:GetBucketAcl",
              "s3:GetBucketPolicyStatus",
              "s3:GetBucketPublicAccessBlock"
            ],
            "Resource": [
                "arn:aws:s3:::<source-bucket>"
            ]
        },
        {
            "Sid": "DestinationBucketWrite",
            "Effect": "Allow",
            "Action": [
                "s3:PutObject"
            ],
            "Resource": "arn:aws:s3:::<destination-bucket>/*"
        },
        {
            "Sid": "DestinationBucketSecurityCheck",
            "Effect": "Allow",
            "Action": [
              "s3:ListBucket",
              "s3:GetBucketAcl",
              "s3:GetBucketPolicyStatus",
              "s3:GetBucketPublicAccessBlock",
              "s3:GetBucketObjectLockConfiguration"

            ],
            "Resource": [
                "arn:aws:s3:::<destination-bucket>"
            ]
        }
    ]
}
Note: The
Sidattributes are optional and are left here to indicate the effect of the statements.
For more information relating to setting up access between DataMasque and AWS EC2 instances, please refer to the following AWS Documentation
For non-EC2 machines
Access the machine where DataMasque is running, either via SSH or other means.
Install AWS CLI and configure your own credentials:
curl "https://awscli.amazonaws.com/awscli-exe-linux-x86_64.zip" -o "awscliv2.zip"
sudo yum install -y unzip
unzip awscliv2.zip
sudo ./aws/install
aws configure
Enter your AWS Credentials.
Test the connection to reach the S3 bucket.
