Getting Started with DataMasque
Welcome to DataMasque. This guide aims to get you up and running quickly so that you can use DataMasque's best-of-breed feature set to take control of your organisation's sensitive data.
If at any time you come across unfamiliar terminology, you may find it helpful to refer to the DataMasque glossary.
- DataMasque at a glance
- How it works
- How to access your DataMasque instance
- Support information
- Next steps
DataMasque at a glance
DataMasque makes best practice data masking simple. By "best practice", we mean data masking that:
- Removes sensitive information from the data.
- Produces a masked dataset that is functional - data integrity is maintained to support testing and validation of the database and its dependent applications.
- Replaces sensitive data with values that are still realistic - replacement data is representative of the real data for the purposes of thorough testing and validation.
DataMasque provides you with a set of masking building-blocks ('masks'), each of which is designed with these core requirements in mind. While each mask performs one simple masking operation, you can compose combinations of masks to build up sophisticated algorithms that can meet whatever requirements your specific use-case dictates.
How it works
The DataMasque workflow is designed with simplicity in mind while retaining the flexibility you need to fulfil complex and diverse requirements. The two most important entities in DataMasque are Rulesets and Connections (for both databases and files).
- A Connection defines:
- a target database that DataMasque can apply masking to; or
- a remote cloud file store that files can be read from or written to.
- A Ruleset defines a collection of masking logic that DataMasque can apply to a target database or set of files.
Database Masking
Each masking Run you perform will apply a single Ruleset to a single Connection: DataMasque will read data from the Connection's target database, apply the masking logic specified in the Ruleset, and write the masked data back to the target database.
This means that DataMasque performs destructive masking on the target database, and is only intended to be used for masking non-production databases.*
* The exception to this is Amazon DynamoDB, which masks data into a new table. Please see the DynamoDB masking process documentation for more information.
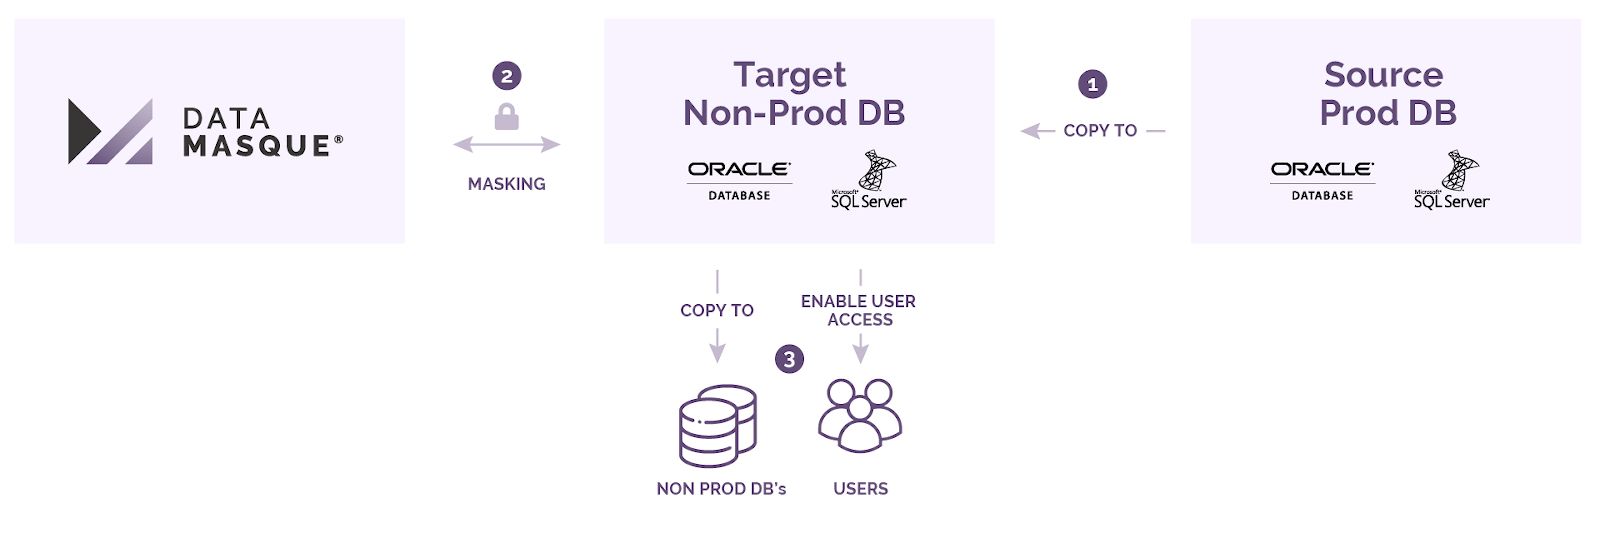
The following diagram describes the recommended data masking workflow to be implemented as part of your non-production data provisioning process.

The following steps are performed in the recommended data masking workflow pictured above:
- Clone/copy the source database containing sensitive data to a non-production masking target database.
- Perform a DataMasque masking run to sanitise the non-production target.
- Provision other non-production clones/copies from the masked database, or enable direct non-production user access. Note: this operation is performed outside DataMasque.
File Masking
Each masking Run you perform will apply a single Ruleset to a pair of Connections. DataMasque will read files from the Source Connection file store, apply the masking logic specified in the Ruleset, and write the masked files to the Destination Connection. Normally these will be different but can be configured to be the same, to effectively mask-in-place.
How to access your DataMasque instance
You can access your DataMasque instance from a client web browser, or via its REST API programmatically as part of an automated database provisioning process.
Dashboard
The DataMasque dashboard of your DataMasque instance is accessible via a web browser - it is not required for you to install any agents or software in order to access the dashboard. Follow the Accessing your DataMasque instance to access DataMasque through your web browser. From here, you can add or edit connections and rulesets, as well as start masking runs.
Refer to the Database Masking Dashboard or File Masking Dashboard user guides for more details on how to use the DataMasque dashboards.
API
DataMasque can be accessed via its REST API, allowing users to utilise various features of DataMasque using automated processes through the use of an API token.
Refer to the API Reference user guide for how to obtain an API token, and the available API endpoints.
Next steps
Ready to get started masking? Work your way through our tutorial and masking best practices guide.
Support information
DataMasque provides full product and installation support within 72 hours of making an enquiry. Contact the support team at support@datamasque.com for any enquiries you may have.
